Digital Video for Teaching
Your participation in this session will enable you to:
- Plan for the production of a simple digital video.
- Edit video and audio with the iMovie application, including trimming clips, creating titles, developing transitions, and adding narration or background music.
- Publish video in digital formats appropriate to use on DVD, CD, iPod, iPad, or the Web.
Before launching into your hands-on production, you should explore how digital video is being used in higher education, introduce yourself to iMovie, and think about how you might apply video to your own teaching and research.
To see how digital video is being used in higher education today, review these examples from colleges and universities around the country.
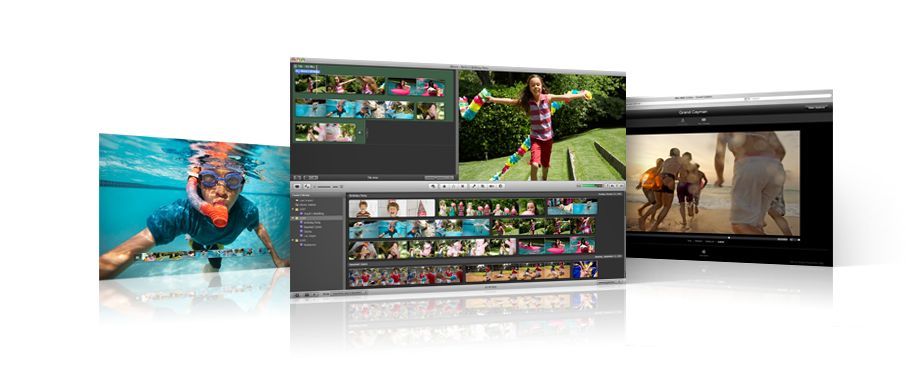
To familiarize yourself with the capabilities of the iMovie software, and to learn the basics of its operation, browse the following online resources:
Consider how you might apply digital video to your teaching, research, or student assignments. Base your brainstorming on the examples you saw on the Web, and on these possibilities: - Short video clips that students can compare and contrast, such as scenes from plays or excerpts from documentaries.
- Capture of observational data from experiments, student performances, or historical events.
- Recording of guest speakers for later use with other sections, or for oonline posting and reference.
The hands-on portion of this seminar takes you through the process of planning, shooting, importing, editing and publishing a very simple digital video project. In this short time, you will not become an expert with all of the capabilities of iMovie, nor will you emerge as a seasoned video producer. The aim of these exercises is to introduce you to the aspects of digital video production.
A Storyboard is a diagrammatic plan for a video project.
A storyboard simply sets forth an outline the visual and auditory content of the video. Your first step in creating your video project is to sketch out what you plan to present. A blank storyboard form may also be used. For the purposes of this seminar, plan a video of about one minute, with three our four sections. In your planning, take into consideration the time you have available for shooting (about 20 minutes), the locations you have available, and the objects you can shoot conveniently. In most cases, you should restrict yourself to shooting the people and places in the immediate vicinity of the seminar classroom. For this project, consider a short video that introduces a concept in your course, or that poses a question in a dramatic manner, or that provides a quick set of contrasts for students to analyze.
Present your completed storyboard to your fellow participants, and to the instructor for comments and suggestions for improvement. When you move to the next step in the process, you will use your storyboard to guide the setup and conduct of your shooting.
Your task here is to shoot the video necessary for each portion of your storyboard. Before you shoot, set things up carefully. Follow these guidelines: LightingMake sure the subject is well-lit, preferably from behind the camera. Light from the side that creates interesting shadows on the subject, will provide video that shows off facial expressions, color and texture better than light from directly above or straight on. Indoors, you may want to use an extra light - any light will do - that shines from the side onto your subject. Classroom fluorescent lights in the ceiling can provide some light, but their color and location is not the best for video. Supplement these with an incandescent lamp at the side and you'll get better video. CompositionUse a tripod if possible for all of your shooting. A tripod makes a bigger difference than you might think. Steady video is easier to watch, and compresses better for the Web. Carefully frame your shot in the viewfinder from the tripod before you start recording. Zoom in for as tight a shot as you can get. Don't be afraid to let the subject fill the viewfinder - if it's an interview, experiment with a shot that only shows the face. Keep the clips short and active. Avoid rapid pans and zooms. Unless you are trying to create a mood of activity and confusion, keep the background simple. AudioIf you are recording an interview, use an external microphone placed near the speaker's mouth. Pin the mike to the subject's shirt, or have an assistant hold the mike for you just off-camera. A standard inexpensive microphone with a one-eighth inch phone plug will suffice. Connect the microphone to the microphone jack of the camcorder. If it's impossible to use a microphone, shoot from less than three feet away and tell the subject to speak loudly toward the built-in microphone in the camcorder. You can assure the quality of your audio by monitoring it, using standard headphones connected to the camcorder's headphone jack. RetakesAfter you've shot the clip, and while the subjects are still available, rewind the tape to watch (also listen to) what you've just recorded. If it's not 100% what you need, shoot it again. It's OK to shoot the same scene several times and pick the best clip later. In fact, you might try shooting from a different angle, with different lighting, or with a new form of composition, so you have some choices when it comes time to edit the video. It's a lot easier to shoot the additional takes now than to try and recreate the shot another day. Always start the camera recording at least five seconds before you start the action, and let it run for five seconds after you're done. ShootNow, you are ready to shoot the video clips for your project. You don't need long and involved clips for most educational projects. Make sure you have a fresh DV cartridge, cued to a blank place on the tape, before you press the record button. If your camera is not wired to the electricity, make sure the battery is charged. Then follow these steps: - Look carefully at your storyboard or shot list to see exactly the clips you will need. Note how long the clips should be.
- Mount the camcorder on a tripod and connect the microphone.
- Set up the scene and instruct any actors on what will be happening.
- Set the camera to the Camera setting and remove the lens cover.
- Press the record button to start the recording.
- Wait five seconds and begin the action.
- While recording, keep quiet and don't touch the camera or tripod.
- Press the record button to stop the recording.
- Switch the camera to the VTR setting, and rewind the tape.
- Press the play button and review what you shot.
- If you are happy with the results, stop the tape at the end of the clip and set up your next scene.
Now that your video material has been captured to the DV cartridge in your camera, or stored in your iPhoto library as still images, it’s time to move it from there into iMovie. Importing Video To import video from your video camera, follow these steps:
- Connect your camera to your computer, using the cable provided.
- Set the camcorder on to VTR mode.
- Click the camera import button in iMovie.
- If necessary, click the rewind button on iMovie to rewind your tape to its beginning.
- Locate the beginning of your first clip. Begin importing just before the actual beginning of the clip. You'll edit the clip before you use it.
- Click the Import button on iMovie to begin your capture.
- Notice that the clip appears in the mivie Event Widow at the bottom.
- Capture all of the clips you need.
- Turn off the camera.
You may notice that iMovie splits some of your imports into separate clips. That's because it's set to look for scene changes in your video, and automatically to import each scene as its own clip. You can turn this feature off in the Preferences..
Now that your video clips are imported, you can disconnect the camera. Importing Images
To import images into your video, place them first into your iPhoto library. Then, in iMovie, select the Media Browser, and in the Media Browser select the Photos tab. To add one of these images to your movie, simply drag it into the video track at the upper left.
In most cases, your clips will need to be trimmed for the final product, you’ll want to add some titles and transitions, and perhaps some audio. Follow these steps to perform these editing chores.
Trim clips
Some of your clips may need to be edited so they start and stop in exactly the right place. To trim a clip, follow these steps:
- Click a clip in the Event Window.
- Play the clip (spacebar) and make note of where you want to start and stop it.
- To crop off the beginning or end of the clip, click and drag over the part you want to remove.
- Notice the yellow selection outline.
- Press the delete key on your keyboard.
- Drag the remaining clip up to the Project window.
iMovie offers a dozen options for presenting titles, as many fonts as you have on your computer, and the choice of having titles appear over a black screen or over the visuals in your movie. Here's how to add a title:
- Cick the Titles button on the right (upper-case T).
- Drag a title style up to the Project window, and drop it where you want it to appear.
- If you want the to appear superimposed over a video clip or photo, drop it right onto the visual.
- If you want the title to appear by itself, drop it between clips.
- Type the text for your title in the Monitor window.
- To edit the title later, click the blue stripe above the clip in the Project window.
Titling hints…
- If you want a title to appear over a plain background as its own separate scene, drop it between video clips in the Project window
- If you want the title to appear over the video, drop it right onto a clip or photo.
- Experiment with different text colors and different type sizes.
- Use large type sizes and simple fonts for easy reading when compressed.
Transitions may be inserted between clips. iMovie makes this very easy to do -- but beware. Flashy transitions seldom add value to the message you are trying to convey with your video, and more often than not cause distraction to the viewer. Use transitions only when necessary to soften the jump from one scene to the next. To add transition between clips, follow these steps:
- Click the Transitions button at the right.
- Choose a simple transition from the display, such as Cross Dissolve.
- Drag and drop the transition you chose between two clips in the timeline.
- Rewind the movie and watch the transition.
Make sure the duration of the transition is shorter than the duration of the clips between which it appears.
Add Narration You can add narration to your video. Here's how.
- Click the Voiceover button in the middle (microphone).
- Speak into the microphone of your computer. If it's set up properly, you'll see the audio level in the Voiceover panel react to your voice.
- Speak up – keep the level at three-fourths of the maximum.
- Position the mouse pointer over the clip in the timeline where you want the narration to start.
- When you are ready, click the mouse, wait three seconds, and speak.
- When you are finished speaking, click the spacebar to stop.
- Watch the narration appear as a purple sound track in theProject window.
Add Music
It’s easy to add music from your iTunes Library, or sounds from the iLife library.
- Click the the Music browser button on the right.
- Browse the various libraries, using the drop-down menu.
- To preview a sound, click the Play button at the bottom.
- Drag the music you want from the iTunes Library, into the project window, and drop it where you want it to play.
Watch the music appear in an audio track. Check its length in comparison to your movie. If it’s too long you’ll need to trim off the end. To trim the audio track, follow these steps:
- Position your mouse pointer over the end of the audio clip.
- When it turns to a trim icon, click and drag to shorten the sudio clip.
Adjusting the volume
You can adjust the audio levels in video clips and voiceover tracks relative to each other.
- Select the clip (video or voiceover) that you want to adjust.
- Click the Inspector button in the middle ( i ).
- Click the audio tab in the Inspector panel.
- Use the sliders and checkboxes to adjust the levels.
To be shared with others, posted to the Web, or saved on CD or DVD, or made playable on the Web, you need to export your clips from iMovie in a useful format. Here's how: - Play your project one more time in the iMovie window to make sure it's the way you want it.
- From the menubar, choose Share.
- Select how you want to export the movie: to your iTunes library, to iDVD, to YouTube, or Export.
- Select Export if you want a compressed file for the Web, iPad, iPod, or iWeb.
- Click the size of movie you want to export.
- Click the Export button, and watch the process.
Now that you have seen the capabilities of iMovie, and have created a simple digital video production, your next step is to image the possibilities. - Where can video be useful in your teaching?
- In your research?
- In your students’ assignments?
Discuss these questions with your colleagues at the seminar, and make a plan for your next digital video project.
|